
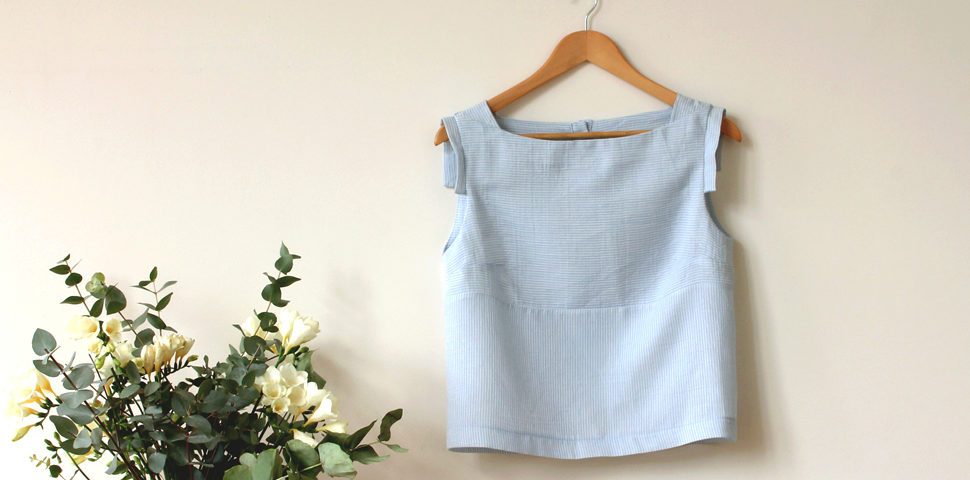
Our Paris top looks very different with a few simple changes and new details: sleeveless, with a back buttoned placket and a horizontal cut that allows new possibilities… Here is how to transform your Paris pattern in a few steps!
Supplies
- The Paris top sewing pattern
- A long ruler
- A set square (optional but very useful!)
- A French curve (only if you opt for the facings option for the armholes)
- Blank paper
- A fine pen, an eraser, scotch tape, paper scissors.
What’s new
We have inserted a cut under the bust (perfect to play with the stripes directions on our striped fabric, but you could as well imagine a color-block version). We removed the sleeves and replaced them with rectangular cap sleeves. We also added a buttoned placket at the center back, instead of the former zipper, with a little rectangular opening at the bottom.
We used a 100% cotton double gauze (azure with thin offwhite stripes), available at Stragier for 19,9€ per meter.

Modifying the sewing pattern
/// BACK (pieces #4 and 5) ///
- Straighten the bottom of the back piece to remove the slight curve.
- The back will be cut twice instead of once on fold line. To add the placket (which will be 2cm wide once sewn), add 4cm at the center back.
- We will create a rectangular opening at the bottom of the placket (as shown on our pictures). This opening will be 2cm wide (same as the finished placket) and 6cm high (which means 10cm from the bottom of the back piece, since the hem is 4cm high). Place a marker at the bottom of the center back, 10cm from the new bottom line. Trace also a new vertical line 1cm from the centerback line. Add a 1cm seam allowance.
- Add a seam allowance at the center back of the back facing (piece number 5), which will now be cut twice instead of once on fold line.

/// ADDING THE HORIZONTAL CUT ///
- Trace a straight line 26cm from the bottom line of the front and back pieces.
- Add a seam allowance under this line (the seam allowance depends on how you wish to finish the seams, it can be 0,7cm for a whipstich, 1cm for a regular seam, 1,5cm for a French seam…). Trace the bottom part of the piece on another piece of paper and add the seam allowance at the top of it.
- After these steps, you should have turned two pieces (front and back) into four: top front, bottom front, top back and bottom back.

/// NEW PATTERN PIECES ///
Please note that the creation of these new pieces depends on the finishings you opt for.
- Rectangular cap sleeves: if you wish to add some, cut a 26x6cm rectangle.
- Finishing the armholes: you can either use bias tape or draw facings. If you choose this last option, make sure to recreate the shoulder line (combining the front/back pieces with the shoulder yoke as indicated in the diagrams below) before you trace the facings.
- Finishing the opening at the bottom of the back: you can either make a small hem (the fabric will be folded twice 0,5cm) or sew a small facing. If you opt for the facing, trace a rectangle of 8x3cm.

Cutting
Here is the final list of the pattern pieces you will need (in gray, the pieces from the original version – in beige the modified and new pieces). Original pieces number 6 (sleeve) and 7 (zipper facing) are not used.
| Number | Name | Cutting directions |
| 1A |
Top front |
Fabric x 1 on fold line |
| 1B |
Bottom front |
Fabric x 1 on fold line |
| 2 | Shoulder yoke |
Fabric x 2 |
| 3 |
Front facing |
Fabric x 1 on fold line, fusible interfacing x 1 on fold line |
| 4A | Top back |
Fabric x 2 |
| 4B | Bottom back |
Fabric x 2 |
| 5 | Back facing |
Fabric x 2, fusible interfacing x 2 |
| 6 | Front armhole facing |
Fabric x 2, fusible interfacing x 2 |
| 7 | Back armhole facing |
Fabric x 2, fusible interfacing x 2 |
| 8 | Rectangular cap sleeve |
Fabric x 2 |
| 9 | Back opening facing |
Fabric x 2 |
Sewing directions
1- Assemble the top and bottom fronts together, then the top and bottom backs together. Close the front darts.
2- Finish the sides of the front and back pieces, and the bottom of the front and back facings (whipstitch, overcast, hem, bias tape… depending on your habits).
3- Sew the shoulders as indicated in page 7 in the leaflet (front (1AB), back (4AB), shoulder yokes (2), neckline facings (3 and 5)).
4- Sew the sides of the top.
5- Stitch the armholes facing one front with one back at the shoulder and the side seam. Finish the edges. Fold the cap sleeves in half in height, right sides facing, and sew the top and bottom 1cm from the edge. Recut the seam allowance and turn right side out.

6- Sew the cap sleeves and armholes facings: pin the cap sleeve first, right sides facings, on the garment matching the middle of the capsleeve with the peek of the triangle on the shoulder. Place the armhole facing above, matching the side seams and shoulders. Stitch 1cm from the edge, understitch and turn the facing right side out, wrong sides facing with the inside of the garment. Topstitch and/or use invisible hand stitches to keep the facing into place.
7- Create the buttoned placket at the center back on the two back pieces. Fold 1cm to the wrong side of the fabric, then 2cm right sides facing. Sew the seam allowances at the top and bottom of the placket, then turn the placket right side out. Topstitch to finish the placket.
(If your fabric is thin or fragile, you can insert some fusible interfacing inside the placket to make it stronger).
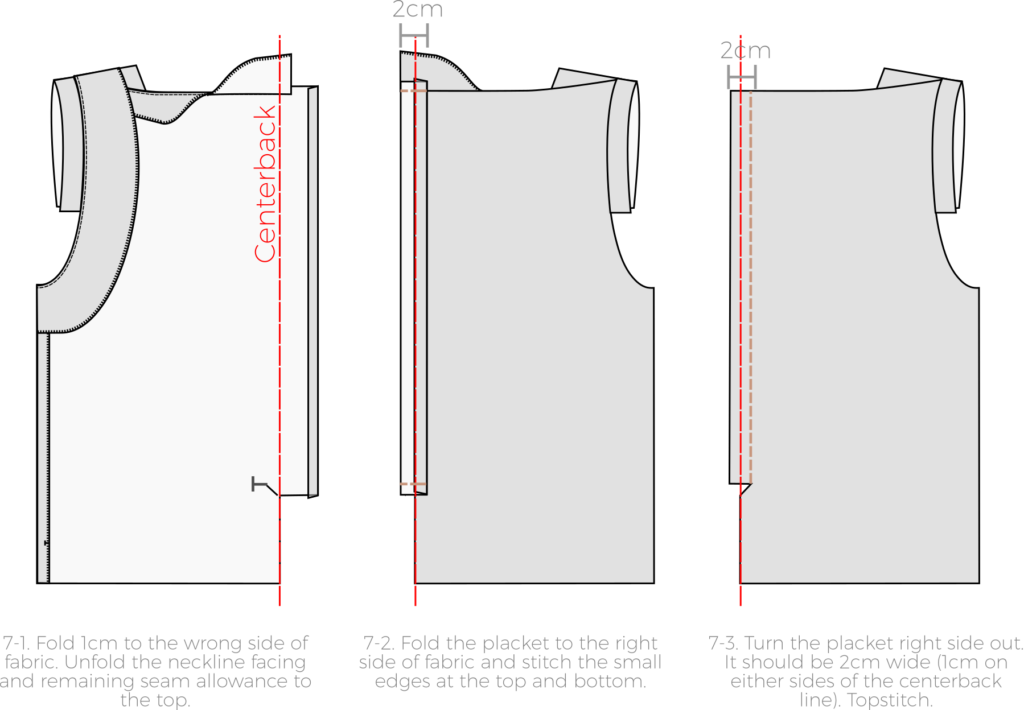
8- Finish the opening at the bottom of the placket: either hem it (fold twice 0,5cm then topstitch) or sew the facing as indicated on the first diagram below. Hem the bottom of the top (see the leaflet for more information on the hem).
9- Fold the facing in height right sides facing, and sew the small sides. Turn the facing right side out and fold it to the wrong side of fabric. Hide the seam allowance inside and topstitch.


10- Sew the buttons and buttonholes on the centerback line. In our example, we used five 1,1cm buttons. The first and last are placed 2cm from the edges.
That’s it! If you like the result, do not hesitate to share it with the #orageuseParis hashtag.
